We can control the type of data or the values that users can enter into a particular cell or range using Data Validation in Excel.
In This Section:
What is data validation and Its Use:
Data Validation is a feature available in Excel to define restrictions and what data can enter in a cell or a range.
For example,
1. We can restrict data entry to a certain range of values
2. User can select a choice form predefined list
3. We can display a message to provide the instruction to the user
4. We can display a message when user enter an incorrect value
Creating a simple list to enter gender of a person – Practical Learning
Step 1: Select a Range or Cells which you want to restrict or add data validation
Step 1: Select a Range or Cells which you want to restrict or add data validation
Step 2: Click on the Data Validation tool from the Data Tab
Step 3: Set the Validation Criteria: Select List from the Allow drop-down list in the Setting Tabs
Step 5: Enter the values to show in the Drop-down list
You are done! Now you can check the range, your list is available to choose
How to choose list items from a Worksheet
It is a good practice to have your list of values in the worksheet and choose those values for drop-down list. It is particularly very useful when your data list is having more number of items or your list is changing frequently.
Follow the below Steps to choose the list items from worksheet:
- Select the Range / Cells to restrict or add data validation.
- Click Data Validation Tool from Data menu
- Click List in the Allow drop-down list from the Settings tab
- Click Source button to select the list Items
- Select the Range to fill the drop-down
How to set user instructions message
You can provide the instructions to the user while entering the data. In the following example, we will see how to restrict the enter values between a range and provide the user instructions.
Follow the below Steps to choose the list items from worksheet:
- Select the Range / Cells to restrict or add data validation.
- Click Data Validation Tool from Data menu
- Select Whole number from the Allow drop-down list in the Settings tab
- Select between number from the Data drop-down list in the Settings tab
- Enter Minimum and Maximum Values (example: 1 and 100)
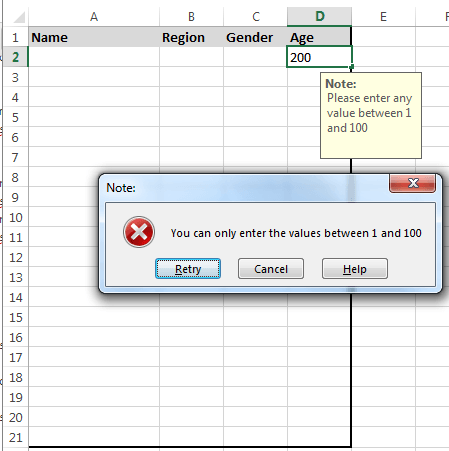
- Goto Input Message Tab and Enter Required Title and Instructions in the Input Message Box (example: ‘Note:’ and ‘Please enter any value between 1 and 100’), then Click on OK
- You are done! Now you can select the cell, you can see the instructions
How to Set user alert message
You can provide the error message to the user while entering the incorrect data. In the following example, we will see how to provide an alert message to the user.
Follow the below Steps to choose the list items from worksheet:
-
The below first 5 steps are same as above
- Select the Range / Cells to restrict or add data validation.
- Click Data Validation Tool from Data menu
- Select Whole number from the Allow drop-down list in the Settings tab
- Select between number from the Data drop-down list in the Settings tab
- Enter Minimum and Maximum Values (example: 1 and 100)
- Goto Error Alert Tab and Enter Required Title and Instructions in the Error Message Box (example: ‘Note:’ and ‘You can only enter the values between 1 and 100’)
- You are done! Now you can select the cell, and try to enter a value which is not between 1 and 100

Example File
Download this example file and see different ways of using data validation features of Excel.


