Calculator using Excel VBA Userform :Project Objective
Calculator using Excel VBA Userform. Following is the step by step detailed explanation to automate this project using VBA. How we are doing calculations, clear the text, etc.
How we are going to develop this project module (The KEY steps) :
To createc calculator, you can see the design of the userform in the section. Let me explain the key steps to develop this caculator project. We are going to write multiple procedure s for multiple controls with the below approach.
- Step 1: Create UserForm: we have to first create the userform from the Insert menu in VBA Editor.
- Step 2: Place toolbox controls on the created userform: Place required controls on the userform. You can drag the controls from the toolbox and drop controls on the userform.
- Step 3: Set properties and alignment of all controls: Properties of each control has set. It is shown in the design section.
- Step 4: Clear Button: It is used to clear the display area.
- Step 5: Back Button : It is used to go back one digit.
- Step 6: Divide (/) Button: It is used for division.
- Step 7: Multiplcation (*) Button: It is used for multiplication.
- Step 8: Minus (-) Button: It is used for subtraction.
- Step 9: Add (+) Button: It is used for addition.
- Step 10: Dot (.) Button : It is used to add dot to the number.
- Step 11: One (1) Button: It is used to display number 1.
- Step 12: Two (2) Button: It is used to display number 2.
- Step 13: Three (3) Button: It is used to display number 3.
- Step 14: Four (4) Button: It is used to display number 4.
- Step 15: Five (5) Button: It is used to display number 5.
- Step 16: six (6) Button: It is used to display number 6.
- Step 17: Seven (7) Button: It is used to display number 7.
- Step 18: Eight (8) Button: It is used to display number 8.
- Step 19: Nine (9) Button: It is used to display number 9.
- Step 20: Zero (0) Button: It is used to display number .0
- Step 21: EqualTo (=) Button: It is used to perform all calculations like addition, substraction, multiplcation, etc .
- Step 22: Textbox: It is used to display result.
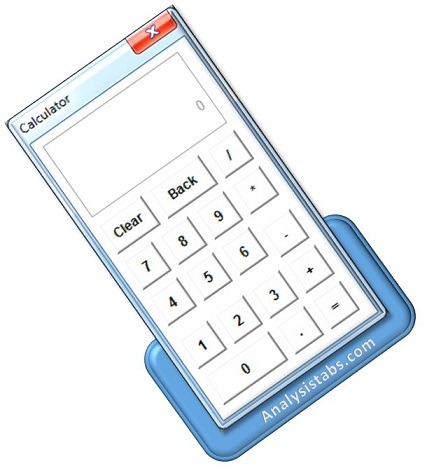
Design of the Calculator :
Now, let us see the design of the calculator project of each control properties and their values on the userform:
| Control | Property | Value |
|---|---|---|
| UserForm | Name | frmCalculator |
| Frame | Name | displayFrame |
| TextBox | Name | txtDisplay |
| Enabled | False | |
| SpecialEffect | 0-frmSpecialEffectFlat | |
| TextAlign | 3-frmTextAlignRight | |
| TextBox | Name | txtRes |
| Value | 0 | |
| Enabled | False | |
| SpecialEffect | 0-frmSpecialEffectFlat | |
| TextAlign | 3-frmTextAlignRight | |
| EnterKeyBehavior | True | |
| CommandButton | Name | cmdBtnclr |
| Caption | Clear | |
| CommandButton | Name | cmdBtnBak |
| Caption | Back | |
| CommandButton | Name | cmdBtnDvd |
| Caption | / | |
| CommandButton | Name | cmdBtnMult |
| Caption | * | |
| CommandButton | Name | cmdBtnMns |
| Caption | – | |
| CommandButton | Name | cmdBtnAdd |
| Caption | + | |
| CommandButton | Name | cmdBtnDot |
| Caption | . | |
| CommandButton | Name | cmdBtnEql |
| Caption | = | |
| CommandButton | Name | cmdBtn1 |
| Caption | 1 | |
| CommandButton | Name | cmdBtn2 |
| Caption | 2 | |
| CommandButton | Name | cmdBtn3 |
| Caption | 3 | |
| CommandButton | Name | cmdBtn4 |
| Caption | 4 | |
| CommandButton | Name | cmdBtn5 |
| Caption | 5 | |
| CommandButton | Name | cmdBtn6 |
| Caption | 6 | |
| CommandButton | Name | cmdBtn7 |
| Caption | 7 | |
| CommandButton | Name | cmdBtn8 |
| Caption | 8 | |
| CommandButton | Name | cmdBtn9 |
| Caption | 9 | |
| CommandButton | Name | cmdBtn0 |
| Caption | 0 |
This is what I used to create calculator design. By changing or setting all the above properties and values of control the form will be looking like below.
Code and explanation for each control:
Step 1: Create Userform and do its initialization by double clicking on the Userform and add the below code.
Private Sub UserForm_Initialize()
    txtRes.MaxLength = 10
    txtDisplay.MaxLength = 10
End Sub
In the above code we are setting maximum length of display numbers is 10. You can change this number.
Step 2: Double click on the textbox (Value-txtRes) and add the following code. Double click on the ‘ Textbox’ and add the below code.
Private Sub txtRes_Change()
     If txtRes.TextLength > 10 Then
        MsgBox "Its Too long to calculate value.", vbInformation
        txtRes.Text = Left(txtRes.Text, 10)
        Exit Sub
    End If
End Sub
In the above code we are displaying message when displaying numbers are exceeding 10.
Step 3: Set properties as mentioned above and do the alignment of all controls as shown above in the screenshot.
Step 4: Double click on the ‘Clear Button’ and add the below code.
Private Sub cmdBtnclr_Click()
    txtRes = 0: txtDisplay = Empty
End Sub
Step 5: Double click on the ‘ Back Button ‘ and add the below code.
Private Sub cmdBtnBak_Click()
    If txtRes <> 0 And txtRes <> "" Then txtRes = Left(txtRes, Len(txtRes) - 1)
End Sub
Step 6: Double click on the ‘ Divide (/) Button’ and add the below code.
Private Sub cmdBtnDvd_Click()
    If txtRes <> 0 Then
        txtDisplay = txtRes
        txtRes = 0
        calVal = "Divide"
    End If
End Sub
Step 7: Double click on the ‘ Multiplcation (*) Button’ and add the below code.
Private Sub cmdBtnMult_Click()
    If txtRes <> 0 Then
        txtDisplay = txtRes
        txtRes = 0
        calVal = "Multiplication"
    End If
End Sub
Step 8: Double click on the ‘ Minus (-) Button’ and add the below code.
Private Sub cmdBtnMns_Click()
    If txtRes <> 0 Then
        txtDisplay = txtRes
        txtRes = 0
        calVal = "Minus"
    End If
End Sub
Step 9: Double click on the ‘ Add (+) Button’ and add the below code.
Private Sub cmdBtnAdd_Click()
    If txtRes <> 0 Then
        txtDisplay = txtRes
        txtRes = 0
        calVal = "Add"
    End If
End Sub
Step 10: Double click on the ‘ Dot (.) Button ‘ and add the below code.
Private Sub cmdBtnDot_Click()
    If txtRes <> 0 Then txtRes = txtRes + "."
End Sub
Step 11: Double click on the ‘ One (1) Button’ and add the below code.
Private Sub cmdBtn1_Click()
    If txtRes = 0 Then
        txtRes = cmdBtn1.Caption
    Else
        txtRes = txtRes + cmdBtn1.Caption
    End If
End Sub
Step 12: Double click on the ‘ Two (2) Button’ and add the below code.
Private Sub cmdBtn2_Click()
    If txtRes = 0 Then
        txtRes = cmdBtn2.Caption
    Else
        txtRes = txtRes + cmdBtn2.Caption
    End If
End Sub
Step 13: Double click on the ‘ Three (3) Button’ and add the below code.
Private Sub cmdBtn3_Click()
    If txtRes = 0 Then
        txtRes = cmdBtn3.Caption
    Else
        txtRes = txtRes + cmdBtn3.Caption
    End If
End Sub
Step 14: Double click on the ‘ Four (4) Button’ and add the below code.
Private Sub cmdBtn4_Click()
    If txtRes = 0 Then
        txtRes = cmdBtn4.Caption
    Else
        txtRes = txtRes + cmdBtn4.Caption
    End If
End Sub
Step 15: Double click on the ‘ Five (5) Button’ and add the below code.
Private Sub cmdBtn5_Click()
    If txtRes = 0 Then
        txtRes = cmdBtn5.Caption
    Else
        txtRes = txtRes + cmdBtn5.Caption
    End If
End Sub
Step 16: Double click on the ‘ six (6) Button’ and add the below code.
Private Sub cmdBtn6_Click()
    If txtRes = 0 Then
        txtRes = cmdBtn6.Caption
    Else
        txtRes = txtRes + cmdBtn6.Caption
    End If
End Sub
Step 17: Double click on the ‘ Seven (7) Button’ and add the below code.
Private Sub cmdBtn7_Click()
    If txtRes = 0 Then
        txtRes = cmdBtn7.Caption
    Else
        txtRes = txtRes + cmdBtn7.Caption
    End If
End Sub
Step 18: Double click on the ‘ Eight (8) Button’ and add the below code.
Private Sub cmdBtn8_Click()
    If txtRes = 0 Then
        txtRes = cmdBtn8.Caption
    Else
        txtRes = txtRes + cmdBtn8.Caption
    End If
End Sub
Step 19: Double click on the ‘ Nine (9) Button’ and add the below code.
Private Sub cmdBtn9_Click()
    If txtRes = 0 Then
        txtRes = cmdBtn9.Caption
    Else
        txtRes = txtRes + cmdBtn9.Caption
    End If
End Sub
Step 20: Double click on the ‘ Zero (0) Button’ and add the below code.
Private Sub cmdBtn0_Click()
    txtRes = txtRes + cmdBtn0.Caption
End Sub
Step 21: Double click on the ‘ EqualTo (=) Button’ and add the below code.
'21. Final Calculations
Private Sub cmdBtnEql_Click()
On Error GoTo ErrOcccered
    'Dim txtRes As Long

    If txtDisplay = "Cannot divide by Zero" Then txtDisplay = Empty

    If txtRes <> "" And calVal <> "" Then
        FNum = Val(txtDisplay): SNum = Val(txtRes)
        Select Case calVal
            Case "Add"
                txtRes = FNum + SNum
            Case "Minus"
                txtRes = FNum - SNum
            Case "Multiplication"
                txtRes = FNum * SNum
            Case "Divide"
                If SNum = 0 Then
                    txtRes = "Cannot divide by Zero"
                Else
                    txtRes = FNum / SNum
                End If
            Case Else

        End Select
        txtdisplay = Empty
    End If
ErrOcccered:

End Sub
Final VBA Module Code(Macro):
Please find the following procedures to create calendar project. Please these procedures after creation of the design (as shown in the above) and right click on the Userform select view code and place it.
‘Variable Declaration
Public tmpVar As String
Public calVal As String

'1. Assign Maximum length to diplay numbers
Private Sub UserForm_Initialize()
    txtRes.MaxLength = 10
    txtTo display.MaxLength = 10
End Sub

'2. To displaying message when exceeding more then 10 numbers on the To display area.
Private Sub txtRes_Change()
     If txtRes.TextLength > 10 Then
        MsgBox "Its Too long to calculate value.", vbInformation
        txtRes.Text = Left(txtRes.Text, 10)
        Exit Sub
    End If
End Sub

'3. Settings properties of the userform.

'4. To clear data in the To display field
Private Sub cmdBtnclr_Click()
    txtRes = 0: txtdisplay = Empty
End Sub

'5. To go back one step.
Private Sub cmdBtnBak_Click()
    If txtRes <> 0 And txtRes <> "" Then txtRes = Left(txtRes, Len(txtRes) - 1)
End Sub

'6. For divide symbol
Private Sub cmdBtnDvd_Click()
    If txtRes <> 0 Then
        txtdisplay = txtRes
        txtRes = 0
        calVal = "Divide"
    End If
End Sub

' 7. For multiplication symbol
Private Sub cmdBtnMult_Click()
    If txtRes <> 0 Then
        txtdisplay = txtRes
        txtRes = 0
        calVal = "Multiplication"
    End If
End Sub

'8. For minus symbol
Private Sub cmdBtnMns_Click()
    If txtRes <> 0 Then
        txtdisplay = txtRes
        txtRes = 0
        calVal = "Minus"
    End If
End Sub

'9. For addition symbol
Private Sub cmdBtnAdd_Click()
    If txtRes <> 0 Then
        txtdisplay = txtRes
        txtRes = 0
        calVal = "Add"
    End If
End Sub

'10. Add Dot to the To display area
Private Sub cmdBtnDot_Click()
    If txtRes <> 0 Then txtRes = txtRes + "."
End Sub

'11. To display Number 1.
Private Sub cmdBtn1_Click()
    If txtRes = 0 Then
        txtRes = cmdBtn1.Caption
    Else
        txtRes = txtRes + cmdBtn1.Caption
    End If
End Sub

'12. To display Number 2.
Private Sub cmdBtn2_Click()
    If txtRes = 0 Then
        txtRes = cmdBtn2.Caption
    Else
        txtRes = txtRes + cmdBtn2.Caption
    End If
End Sub

'13. To display Number 3.
Private Sub cmdBtn3_Click()
    If txtRes = 0 Then
        txtRes = cmdBtn3.Caption
    Else
        txtRes = txtRes + cmdBtn3.Caption
    End If
End Sub

'14. To display Number 4.
Private Sub cmdBtn4_Click()
    If txtRes = 0 Then
        txtRes = cmdBtn4.Caption
    Else
        txtRes = txtRes + cmdBtn4.Caption
    End If
End Sub

'15. To display Number 5.
Private Sub cmdBtn5_Click()
    If txtRes = 0 Then
        txtRes = cmdBtn5.Caption
    Else
        txtRes = txtRes + cmdBtn5.Caption
    End If
End Sub

'16. To display Number 6.
Private Sub cmdBtn6_Click()
    If txtRes = 0 Then
        txtRes = cmdBtn6.Caption
    Else
        txtRes = txtRes + cmdBtn6.Caption
    End If
End Sub
'17. To display Number 7.
Private Sub cmdBtn7_Click()
    If txtRes = 0 Then
        txtRes = cmdBtn7.Caption
    Else
        txtRes = txtRes + cmdBtn7.Caption
    End If
End Sub

'18. To display Number 8.
Private Sub cmdBtn8_Click()
    If txtRes = 0 Then
        txtRes = cmdBtn8.Caption
    Else
        txtRes = txtRes + cmdBtn8.Caption
    End If
End Sub
'19. To display Number 9.
Private Sub cmdBtn9_Click()
    If txtRes = 0 Then
        txtRes = cmdBtn9.Caption
    Else
        txtRes = txtRes + cmdBtn9.Caption
    End If
End Sub

'20. To display Number 0.
Private Sub cmdBtn0_Click()
    txtRes = txtRes + cmdBtn0.Caption
End Sub

'21. Final Calculations
Private Sub cmdBtnEql_Click()
On Error GoTo ErrOcccered
    'Dim txtRes As Long

    If txtDisplay = "Cannot divide by Zero" Then txtDisplay = Empty

    If txtRes <> "" And calVal <> "" Then
        FNum = Val(txtDisplay): SNum = Val(txtRes)
        Select Case calVal
            Case "Add"
                txtRes = FNum + SNum
            Case "Minus"
                txtRes = FNum - SNum
            Case "Multiplication"
                txtRes = FNum * SNum
            Case "Divide"
                If SNum = 0 Then
                    txtRes = "Cannot divide by Zero"
                Else
                    txtRes = FNum / SNum
                End If
            Case Else

        End Select
        txtdisplay = Empty
    End If
ErrOcccered:

End Sub
Display Calculator on the Worksheet:
Here are steps to display calculator on the Userform.
- Place any shape by clicking on insert menu from illustrations group.
- Right click on the shape, select assign macro.
- select the shape name from the available list and click on OK button.
- Now, go to the Developer tab.
- Design Mode should be turned off from the Controls group.
- Now, go back to the shape and click on the created shape to see the calculator on the Userform.
Instructions to Execute the Procedure:
You can download the below file and see the code and execute it.
- Open VBA Editor window or Press Alt+F11.
- Insert Userform from the Insert menu.
- Create design as shown in the above steps..
- Add Procedures by double clicking on Userform.
- Run the project by hitting F5 key from the keyboard.
- hit the numbers on the calculator and see the output on the display area.
- And als you can use keyboard keys(up, down, left, right and enter to display numbers.
Download the Calculator Project – Excel VBA Project
Here is the Excel macro workbook file to explore the calculator project yourself.

Very nice application.. Thank you very much
good one
Awsome .I was thinking it can only be develped in VB6
Thanks. It helps me a lot
OH NICE
THANKS
what is txtres and txtdisplay variable in here??
txtDisplay is the main text box used to display the entering values, and the txtRes is the textbox used to display the Result.
I love this project, please is there any how we can conmunicate cause there are some section where I got loss.
thanks
I am sticking at a place that is I can’t understand have you used two text boxes or one, if two then where you drop the second text box (is it inside the main text box, the display one).
need help
I’ve got an error, “Compile error. Variable not defined” and highlight blue in calVal=
Private Sub cmdBtnAdd_Click()
If txtRes 0 Then
txtDisplay = txtRes
txtRes = 0
calVal = “Add”
End If
End Sub
please reenter the double quotation marks.
What is FNum and SNum
Thanks, it helped us!