Alignment property of checkbox control is used to specify the position of a checkbox control in Excel VBA. It sets an integer value. The possible values are 0(Left side of a control) or 1(Right side of a control).

Checkbox_Alignment_Property – Syntax
Please find the below syntax of Checkbox control Alignment Property in Excel VBA.
CheckboxName.Alignment=0 (fmAlignmentLeft )
Or
CheckboxName.Alignment=1 (fmAlignmentRight )
Where CheckboxName represents the Checkbox object. In the above syntax we are using ‘Alignment’ property of Checkbox object to set the alignment of Checkbox control.
Checkbox_Alignment_Property – Explanation & Example
Here is the example for Checkbox control Alignment_Property. It will take you through how to set alignment property of Checkbox control property using Excel VBA. Here you can find or see how we are using ‘Alignment’ property of Checkbox manually or using code.
Checkbox_Alignment_Property: Change Manually
Please find the following details how we are changing manually ‘Alignment’ property of Checkbox property.
-
- Go To Developer Tab and then click Visual Basic from the Code or Press Alt+F11.
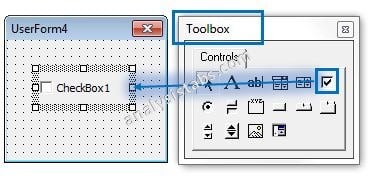
- Go To Insert Menu, Click UserForm. Please find the screenshot for the same.

-
- Drag a Checkbox on the Userform from the Toolbox.
-
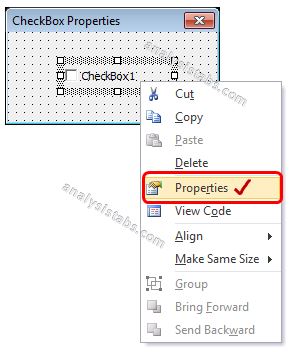
- Right click on the List box. Click on properties from the available list.
-
- Now you can find the properties window of Checkbox on the screen. Please find the screenshot for the same.

-
- On the left side find ‘Alignment’ property from the available List Box properties.
- On the right side you can see the two available options. i.e.
I. 0 – fmAlignmentLeft
II. 1 – fmAlignmentRight
-
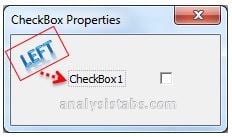
- You can choose any one from the available options. For example, I have choosen ‘0 – fmAlignmentLeft’. This means Checkbox alignment is towards left. You can see same in the screen shot for your understand.

-
- You can choose ‘1 – fmAlignmentRight’ from the available options. This means Checkbox alignment is towards right side. You can see same in the screen shot for your understand.

Checkbox_Alignment_Property: Change Using Code
Please find the following details how we are changing Alignment of Checkbox property with using Excel VBA code.
-
-
- Go To Developer Tab and then click Visual Basic from the Code or Press Alt+F11.
- Go To Insert Menu, Click UserForm. Please find the screenshot for the same.
-
-
-
- Drag a Checkbox on the Userform from the Toolbox. Please find the screenshot for the same.
-
-
-
- Double Click on the UserForm, and select the Userform event as shown in the below screen shot.
-

-
-
- Now can see the following code in the module.
-
Private Sub UserForm_Initialize()

End Sub
-
-
- Now, add the following example code1 or code2 or code3 to the in between above event procedure.
-
Example Code 1:
Here is the example and output when we set column count property to ‘0’. This means it will display all columns in a Checkbox.
'Alignment Property of Checkbox Control
Private Sub UserForm_Initialize()
    'The below statement specifies the checkbox position
    CheckBox1.Alignment = fmAlignmentLeft
End Sub
Or
Private Sub UserForm_Initialize()
    'The below statement specifies the checkbox position
    CheckBox1.Alignment = 0
End Sub
-
-
- Now, Press ‘F5’ to see the following Output.
-
Output: If Alignment =0 or fmAlignmentLeft
Please find the below output when we set Alignment property value is 0. It is shown in the following Screen Shot.
Example Code 2:
Here is the example and output when we set column count property to ‘1’. This means it will display all columns in a Checkbox.
'Alignment Property of Checkbox Control
Private Sub UserForm_Initialize()
    'The below statement specifies the checkbox position
    CheckBox1.Alignment = fmAlignmentRight
End Sub
Or
Private Sub UserForm_Initialize()
    'The below statement specifies the checkbox position
    CheckBox1.Alignment = 1
End Sub
-
-
- Now, Press ‘F5’ to see the following Output.
-
Output: If Alignment =1 or fmAlignmentRight
Please find the below output when we set Alignment property value is 1. It is shown in the following Screen Shot.

