The Macro Recorder is a very useful tool available in Microsoft Excel, you can Record Macro in Excel if you want to automate any daily repetitive task, it helps to save the process time and avoid the human errors.If anyone is not knowing about the writing macros in Excel VBA, they can learn Excel VBA macros by recording macros. Macro recorder will store almost every action you are performing after start recording the macro, so it produce more code than required. Plan the task which you want to automate before start recording to avoid this. We can also open the code and delete any statement if it is not necessary, we will see how to edit and modify the code in the following section. Please find the following steps. It will take you through how to record a macro in Excel VBA for the following example.
Example: In this example I am going to record a macro to ‘change the selected range color’.
In this Topic:
- What is a Macro?
- Steps to Record Macro in Excel
- Personal Macro Workbook
- New Workbook
- This Workbook
- Download File
What is a Macro?
A macro is a set of statements to perform some action, you can store this in a file and execute whenever you want to repeat the same kind of action. For example, you have some data in Excel Worksheet1 and you want to copy a range of a data into various locations of different sheets, in this case you can record a macro and save it in a file, you can execute whenever you want to perform the same kind of task for same type of data.
Steps to Record Macro in Excel:
Step 1: Open Excel Workbook.
Step 2: Go to Developer Tab from the Main Ribbon of Excel Window. If Developer Tab is not visible please find at (Link).
Step 3: You can see the Record Macro command button. Please find the below screen shot for the same.
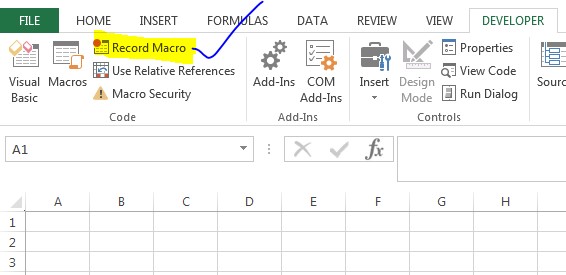
Step 4: Please click on the Record Macro command button. Once you click on the Record Macro command button you can see the following Record Macro dialog box on your screen.
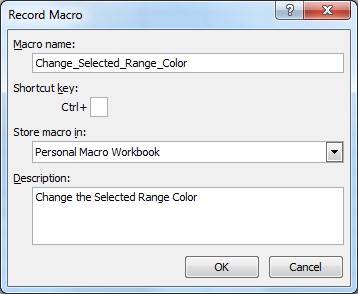
a. Macro Name: Default Macro name will be Macro 1. You can change this name as you want by entering the name in the Macro name field. Here my macro name is ‘Change_Selected_Range_Color’.
b. Shortcut Key: You can assign Shortcut key to the recording macro in the shortcut key field, type any lower case letter or upper case letter that you want to use. You can run a macro by using ‘CTRL + Shift ‘and above mentioned letter entered in the shortcut field. Here I am assigning shortcut key as ‘C’. Now you can run a macro by clicking on ‘CTRL + Shift + C‘.
c. Store macro in: You can store macro in three different locations. Please find the following three location details.
Personal Macro Workbook:
Default file name will be ‘PERSONAL.XLSB’. When we open excel workbook automatically the ‘PERSONAL.XLSB’ workbook also will be open, but it is hidden by default. To see this ‘PERSONAL.XLSB’ workbook we need to unhide it.
Unhide personal macro Workbook:
To Unhide the personal macro workbook please find the following steps.
1. Click on View menu tab from the main ribbon.
2. Go to Window menu and then click on ‘Unhide’. Now you can see Unhide dialog screen as appeared in the following way.
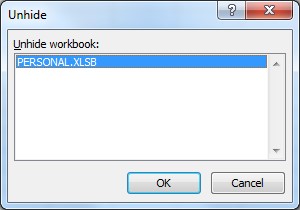
3. Select the ‘PERSONAL.XLSB’ from the Unhide workbook and then click on ok. Now, you can see ‘PERSONAL.XLSB’ workbook.
New Workbook:
You can store the recording macro in the new workbook once you click on OK button in the Record Macro screen, it will automatically open the new workbook and you can see the recorded macro by clicking on Macros command button in the Developer Tab.
This Workbook:
You can store the recording macro in the same workbook where you are writing macro.
d. Description: You can enter the description of the recorded macro in the description field.
Step 5: Click on Ok button after entering all the details of record macro.
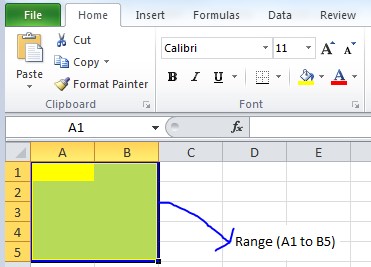
Step 6: Go to Home menu tab from the main ribbon. Select a range (A1 to B5) in the excel sheet. Step 7: Go to Font menu from the Home menu tab and then select the yellow color from the Fill Color. For better understand you can see the range (A1 to B5) and it is highlighted in color in the following screen shot.
Note: While doing these operations don’t perform any other actions till you complete the recording macro.
Step 7: Go to Developer tab and then click on ‘Stop Recording’ command button to stop a macro.
Step 8: To view recorded macro click on Macros command button from the developer tab menu.
Now, it will display the Macro dialog box which is shown in the below screen shot.

Step 9: Select the macro which is listed in the macro name and the click on ‘Run’ macro to execute the recorded macro.
Step 10: Click on ‘Step Into’ to start debugging the macro line by line. When we click on ‘Step Into’ it will take you to the code and first line will be highlighted in yellow color.
Note: When we debug the macro line by line, the lines will be highlighted in yellow color.
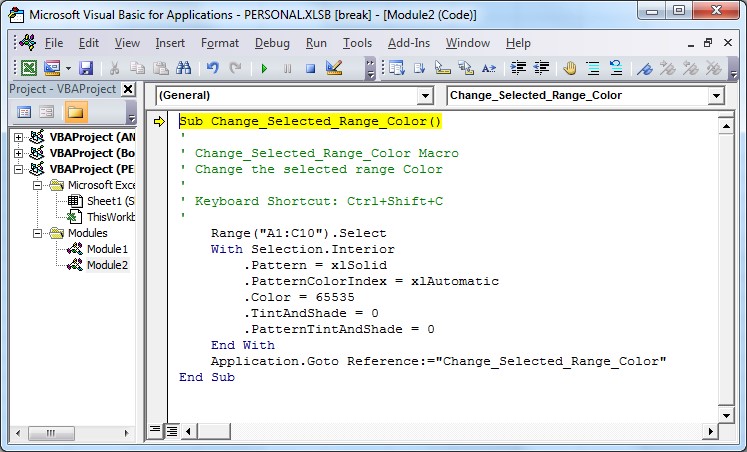
Step 11: If you want to edit/see the recorded macro code, you can click on the ‘Edit’. It will take you to the code. Now you can see the VBA Editor window with the recorded macro. Please find the following screen shot for the same.

Step 12: If you want to delete the recorded macro click on ‘Delete’ button.

I have recorded several macros which will be run on a separate workbook. How can I order the macros or specify which worksheet they apply to?
Any help is appreciated!
Thank you!